How to Build a DIY Vermicomposter: A Step-by-Step Guide
Vermicomposting is an eco-friendly way to recycle organic waste while producing nutrient-rich compost for your garden. In this guide, we’ll walk you through creating a homemade vermicomposter using simple materials.
Materials Needed:
Three durable plastic totes (preferably Roughneck brand for durability)
One lid for the totes
A cooler drain or similar drainage component
Drill with a quarter-inch bit
Bricks or blocks for elevation
Step-by-Step Guide to Building a Vermicomposter
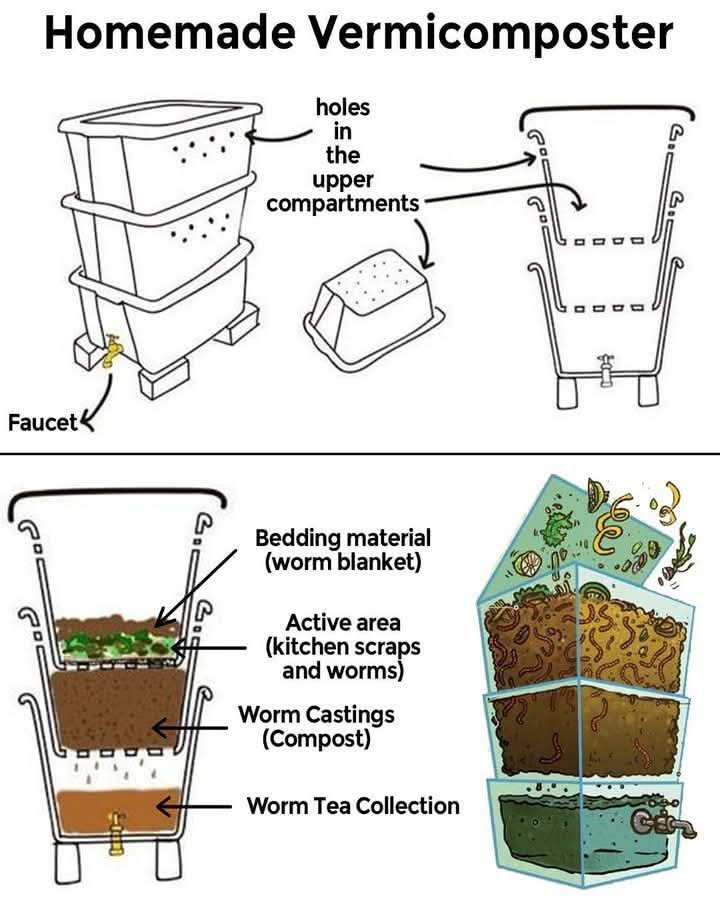
1. Preparing the Totes
To ensure proper aeration and worm mobility, follow these steps:
Drill quarter-inch holes across the bottom of two totes. These allow worms to move between layers and facilitate drainage.
Drill additional holes along the upper edges of these totes to improve airflow and prevent anaerobic conditions.
2. Setting Up the Drainage System
The bottom tote will function as a drainage collector, capturing excess liquid known as worm tea, a powerful organic fertilizer.
Install the cooler drain on the recessed side of the bottom tote for effective liquid drainage.
Ensure proper positioning so that collected worm tea can be easily accessed and used in your garden.
3. Assembling the Vermicomposter
Stack the two drilled totes on top of the bottom drainage tote. These will serve as the living and composting areas for your worms.
Start by adding worms, bedding material (shredded newspaper, cardboard, coconut coir), and kitchen scraps to the top tote.
4. Introducing the Worms
Carefully introduce your composting worms (such as red wigglers) into the top tote along with their bedding and organic waste.
Over time, as they process food scraps, their waste (worm castings) will accumulate, creating rich compost.
Once the top tote is full, shift it to the middle position and begin using the new top tote as the active composting layer.
5. Maintenance and Harvesting Compost
To keep your vermicomposter thriving, follow these maintenance tips:
Regularly add organic kitchen waste like fruit peels, vegetable scraps, and coffee grounds to the top layer.
Ensure the bedding remains moist but not soggy.
As worms consume food, they will migrate upward, leaving finished worm castings in the lower tote.
Once a tote is full of worm castings and mostly free of worms, remove it and use the compost in your garden.
Check the bottom tote periodically to collect worm tea for use as liquid fertilizer.
6. Elevating the System
For better drainage and accessibility:
Place the entire setup on bricks or blocks to allow easy access to the drainage tote and worm tea collection.
Ensure a stable foundation to prevent tipping.
Benefits of a Homemade Vermicomposter
Reduces household waste by composting organic scraps.
Creates nutrient-dense worm castings to improve soil health.
Produces worm tea, a free and powerful liquid fertilizer.
Low maintenance and cost-effective, requiring minimal effort for maximum benefits.
By following this simple DIY vermicomposter setup, you can turn food scraps into valuable compost while contributing to a more sustainable environment. Happy composting!
Share this content: